Descriere
Informații despre produs "MCO Home - Termostat de încălzire electrică cu senzor de umiditate Versiunea 2"
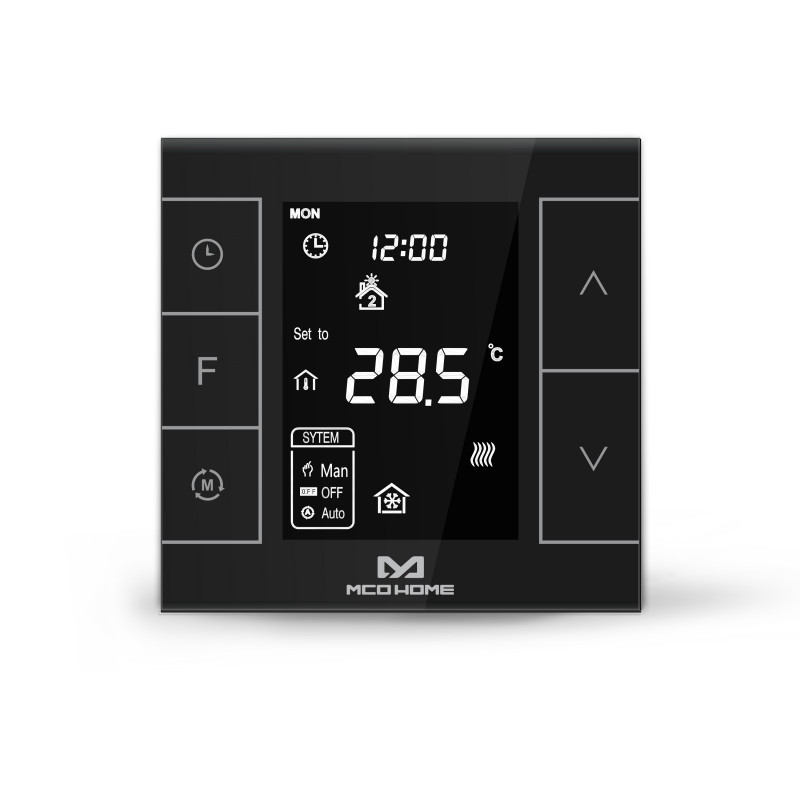
Termostatul MCOEMH7-EH este un dispozitiv pentru controlul temperaturii în cameră, echipat cu tehnologie wireless Z-Wave. Se aplică pentru reglarea sistemelor electrice de încălzire, cum ar fi cablu de încălzire, film electro-termic, dispozitiv de încălzire, supapă electrică etc.
Termostatul de perete MCOEMH7-EH necesită o instalație statică cu alimentare la rețea. Datorită design-ului său modern, cu panou capacitiv din sticlă, este deosebit de potrivit pentru instalarea vizibilă în zonele de locuit.
Cu termostatele de sticlă proiectate modern de MCO puteți controla diferite sisteme de încălzire și răcire - de ex. cablu de incalzire, film de incalzire, supapa de apa, supapa electrica, cazan, bobina ventilator, controler de energie solara, pompa de caldura, sistem de ventilatie etc.
Caracteristici:
Panou din sticlă călită cu butoane capacitive
Programare programabilă: 4 evenimente în fiecare zi de 7 zile 5 + 2; 5 + 1 + 1
Funcționare: Manuală, Auto (Perioade de timp), Vacanță (economie de energie)
Cu doi senzori de temperatură pentru control (al doilea, cel extern, este optional - neinclus in pachet)
Temp. Internă. Senzor: NTC 15K
Senzor de umiditate
Alimentare: 230V
Tehnologie wireless: Z-Wave Plus
Cod Produs: MCOEMH7H-EH-B
.
EN
MCO Home - Electrical Heating Thermostat with humidity sensor Version 2
Product Description
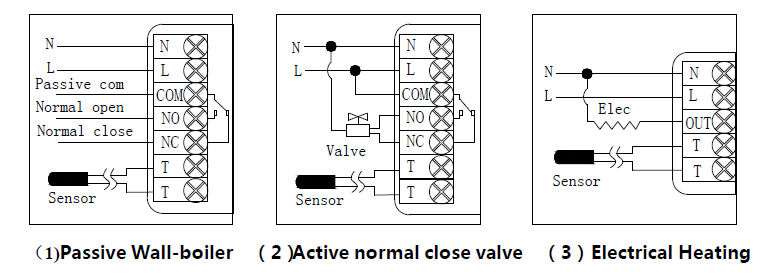
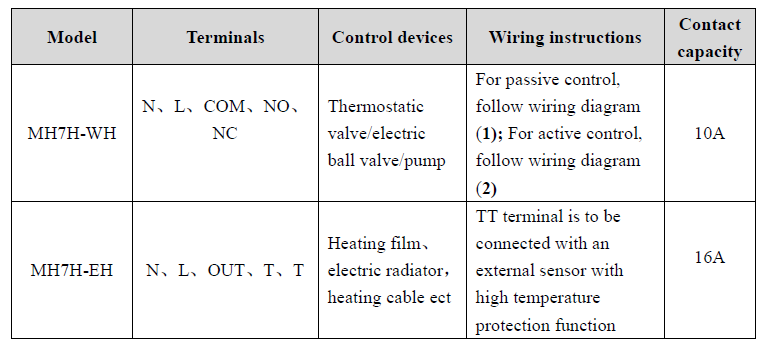
MCOHome Water Heating Thermostat is a Z-Wave enabled device for indoor temperature control. MH7H-WH is mainly applied to control wall mounted boiler, water valve/pump etc. The device is of high reliability and practicability, which can be included and operated in any Z-Wave network with other Z-Wave certified devices from any other manufacturers.
Prepare for Installation / Reset
Please read the user manual before installing the product.
In order to include (add) a Z-Wave device to a network it must be in factory default state. Please make sure to reset the device into factory default. You can do this by performing an Exclusion operation as described below in the manual. Every Z-Wave controller is able to perform this operation however it is recommended to use the primary controller of the previous network to make sure the very device is excluded properly from this network.
Safety Warning for Mains Powered Devices
ATTENTION: only authorized technicians under consideration of the country-specific installation guidelines/norms may do works with mains power. Prior to the assembly of the product, the voltage network has to be switched off and ensured against re-switching.
Installation
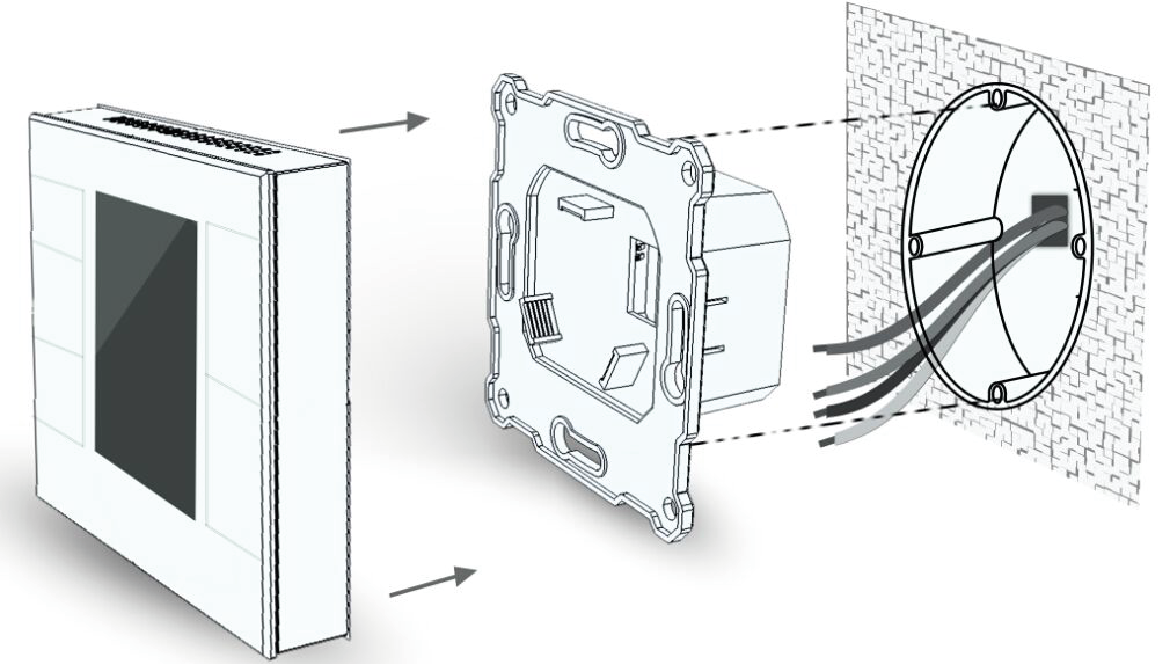
Step 1: Separate the device into two parts: the display panel and the bottom.
Step 2: Insert all wires into the right terminals and tighten screws. Wiring diagrams are shown below.
Step 3: Push the bottom into the junction box and secure it with two screws, and then mount the touch panel back.
Step 4: Confirm the device is well mounted, power on and it is ready to operate.
Inclusion/Exclusion
On factory default the device does not belong to any Z-Wave network. The device needs to be added to an existing wireless network to communicate with the devices of this network. This process is called Inclusion.
Devices can also be removed from a network. This process is called Exclusion. Both processes are initiated by the primary controller of the Z-Wave network. This controller is turned into exclusion respective inclusion mode. Inclusion and Exclusion is then performed doing a special manual action right on the device.
Inclusion
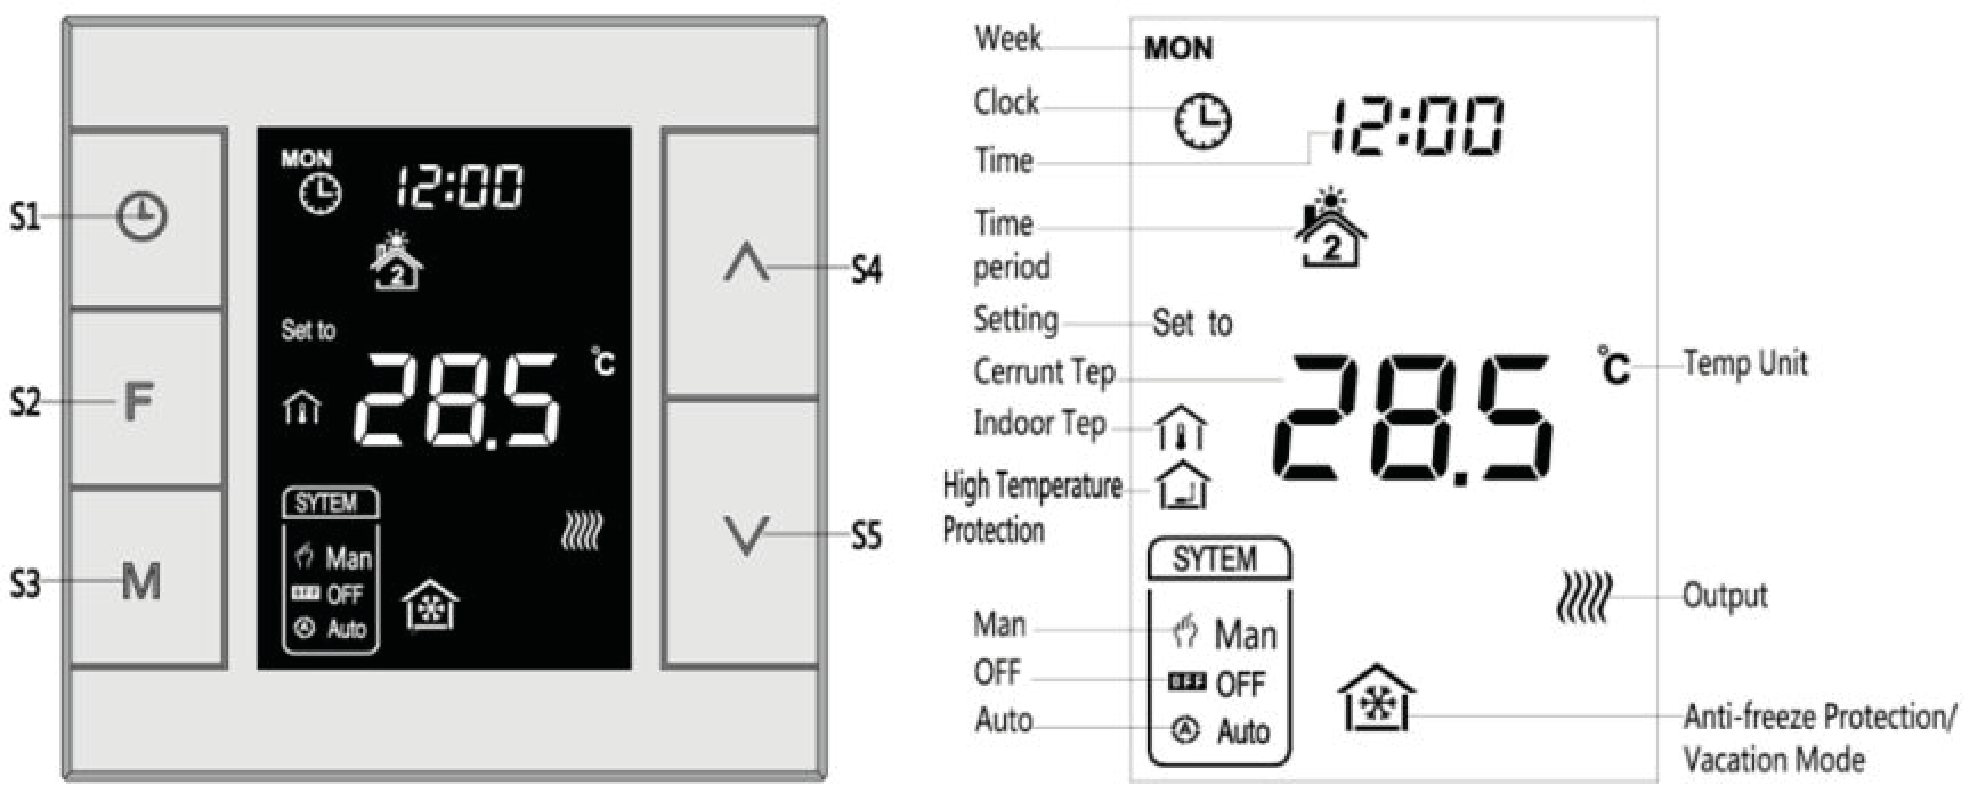
In normal working interface, press & hold S4 to enter interface for inclusion of Z-Wave network. Before device included into network, “- - -” will display on the screen. Then press S4 once, device will enter learning mode to get a node ID. If inclusion is success, a node ID will display on the screen in a few seconds.
Exclusion
In normal working interface, press & hold S4 to enter interface for exclusion of Z-Wave network. Before device excluded into network, a node id will display on the screen. Then
press S4 once, device will enter learning mode to get a node ID. If inclusion is success, "- - -" will display on the screen in a few seconds.
Auto-Inclusion
Beside the standard inclusion this devices supports the so called auto inclusion. Right after powering up the device remains in inclusion state and can be included by (any) gateway without further actions on the device itself. The auto inclusion mode will time out after some time.
Product Usage
On/Off operation
When power on, thermostat displays “OFF”,all outputs are forced off. Touch S3 button to switch (manual/off/auto) mode, then press S2 to confirm and proceed power on/off setting. After power on, device displays current week, local time, working mode, current temperature, output status etc.
Note:After the backlit goes out, please press the button to light up the backlit first, then press the button again for corresponding operation.
Temperature setting
In normal working status, press S4 or S5 button will enter into temperature setting interface.
The setting range is 5-37 ℃(41-99℉). Then press S4 or S5 can adjust the value. Press S3 or wait 25 seconds without any key operation will save the setting and return back to the normal operation interface.
Auto Mode: The changed value only valid in the current time period for this time, and the device will not effect the preset time period value .
Manual Mode: The changed value will be valid until next setting.
Vacation Mode: The changed value will be valid until next setting.
Key lock function
In normal operating interface, long press S1+S4 button, icon appear that indicates the button is locked, at this time all buttons are disabled; When long press S1+S4 button again, icon disappear that indicates the button is unlocked, all buttons back to normal work.
Control specifications
- Detection temperature < setting temperature - 0.5℃, output turns on, and output icon displays.
- Detection temperature ≥ setting temperature + 0.5℃, output turns off, and output icon disappears.
Manual / Auto mode setting
In normal display interface, touch S3 button can switch between Manual and Auto mode.
Choose the mode you may need and press S2 button to save the setting.
Auto Mode: Device will follow the preset time periods and temperature to control heating system automatically.
Manual Mode: Device will follow the manual setting temperature to control the heating system.
Vacation mode setting
- In normal working interface, if vocation mode is not activated, long press S2 button to enter vacation mode temperature setting. The default temperature is 10 ℃, and setting range is 5-37 ℃(41-98℉). Press S4 or S5 to adjust the value, then press S3 or wait 25 seconds to save the setting and return to the normal working interface. In this time vacation mode icon displays, and device will follow the setting.
- Long press S2 again will end vacation mode and resume to normal work, vacation mode icon
will be disappeared.
Local Time Setting
- In normal working interface, long press S1 to enter into local time setting interface.
- In local time setting interface, press S4 or S5 button to set the “week, hour & minute” parameter, and press S1 button can switch among the “week, hour & minute”.
- After finish the local time setting, press S1 or wait 25 seconds without any key operation will save the setting and return to normal display.
Auto Mode Time Periods Parameter Setting
- In normal working interface, short press S1 to enter into time periods setting. Four time periods can be set for each day of the whole week.
- Press S2 can switch among “Hours, Minutes, Temperature value”. Press S4 or S5 can change the value.
- After finished the setting of 4 time periods on Monday, press S1 and follow the same way to set periods of next days.
- After all periods set, press S1 /S2 or wait 25 seconds without any key operation will save the setting and return to normal display. Device will operate in accordance with the new setting.
The default setting is as follow:
High temperature protection
When external temperature sensor (optional) detect the temperature value≥55℃, device will open high temperature protection, electric heating will be forced off, and high temperature protection icon displays.
When external temperature sensor detect the temperature value<50 ℃, device will return to normal work, high temperature protection icon disappears.
Anti-freeze protection function: (Optional)
In shutdown interface:
- When the built-in temperature sensor detect the temperature value≤5℃, device will open anti-freeze protection, electric heating will be forced open, and anti-freeze protection icon displays.
- When the built-in temperature sensor detect the temperature value>8 ℃, device will turn off anti-freeze protection and return to normal work, anti-freeze icon disappears.
Note: If MH7 thermostat do not connect with an external temperature sensor (optional), it will only display the indoor temperature icon; If MH7 thermostat connect with an external temperature sensor, it will display the indoor temperature and high temperature protection icon; When it is under high temperature protection, high temperature protection icon flickers.
Humidity display operation
In normal working interface, long press S1+S5 buttons and enter into humidity display interface, when press S1+S5 buttons again, it will back to the normal interface.
SKU: MCOEMH7H-EH-B
.